Deep inside the guts of JBoss is an instance of another server called Tomcat, and when it comes to using SSL and HTTPS, JBoss delegates all the implementation stuff to that bundled Tomcat installation. As a result, some of the instructions for implementing SSL come directly from Tomcat documentation. For example, I used this document to start figuring out how to enable SSL.
Before starting, there are two things to ascertain:
1. where JBoss is installed on your machine; and
2. that there's a version of the Java Developer's Kit on the JBoss machine.
For the purposes of this write-up, we will describe setting up JBoss to use a temporary, self-signed SSL Certificate. Also, we'll assume that you're installing under Windows.
There are essentially three steps:
1. create the self-signed certificate;
2. move the self-signed certificate to a JBoss directory; and
3. edit the Tomcat configuration file to turn on SSL.
Creating the Self-Signed Certificate
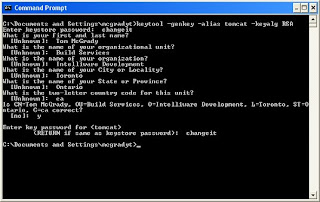
The Java Developer's Kit includes a utility to create certificates. Go to a command line and type the following:
keytool -genkey -alias tomcat -keyalg RSA
This command tells Java to generate a key. Actually, it does two things:
1. it creates a new key; and
2. if necessary, it creates a collection of keys (called a "key store") to put the key in.
There are some prompts that look like this:

Notice that there are two prompts for the password. That's because there's one password for the keystore, and one password for the actual key.
Moving the Keystore
One of the things that the tool isn't very good about is telling you where it created that keystore. By default, the keygen tool puts information in the "Documents and Settings" directory for your userid. In the example, above, we'd find that they keystore has been created as a file called:
C:\Documents and Settings\mcgradyt\.keystore
That location isn't very helpful. Try copying it to the conf directory of your JBoss installation. For example:
C:\Program Files\jboss-4.0.3\server\default\conf
When I do this, I usually change the name to "chap8.keystore" because that's the default name used in the next step.
Update the Configuration File
First up, you should probably shut down the JBoss server as you do this step.
In the JBoss directory, there should be a file called server.xml:
C:\Program Files\jboss-4.0.3\server\default\deploy\jbossweb-tomcat55.sar\server.xml
This file includes information about what web features to turn on when the server starts up. Inside this file, there should be a part that looks like this:
Make the following changes:
1. Uncomment the block
2. Change the port to 443
3. Change the keystore password to the password used, above ("changeit")
The end result should look something like this:
emptySessionPath="true"
scheme="https" secure="true" clientAuth="false"
keystoreFile="${jboss.server.home.dir}/conf/chap8.keystore"
keystorePass="changeit" sslProtocol = "TLS" />
Now start up the server, and if all went according to plan, SSL should now be enabled.
Installing an SSL Certificate
We purchased an SSL Certificate from Verisign. The company offers excellent documentations and instructions on how to install the certificate on their website. Once you purcahse the certificate Verisign we email the you the certificate only after you go through the process of getting all the information they require to verify the web server and wesite.
Below I included a screenshot of the installation process. It is a simply as using one of the java apache tools to install the certificate in the keystore file.


No comments:
Post a Comment