Thursday, November 8, 2007

Configuring SSL Certificates on Tomcat or Jboss

There are a few web pages that describe configuring Secure Socket Layer (SSL) for JBoss, but most gloss over some of the details.

Deep inside the guts of JBoss is an instance of another server called Tomcat, and when it comes to using SSL and HTTPS, JBoss delegates all the implementation stuff to that bundled Tomcat installation. As a result, some of the instructions for implementing SSL come directly from Tomcat documentation. For example, I used this document to start figuring out how to enable SSL.

Before starting, there are two things to ascertain:

1. where JBoss is installed on your machine; and
2. that there's a version of the Java Developer's Kit on the JBoss machine.

For the purposes of this write-up, we will describe setting up JBoss to use a temporary, self-signed SSL Certificate. Also, we'll assume that you're installing under Windows.

There are essentially three steps:

1. create the self-signed certificate;
2. move the self-signed certificate to a JBoss directory; and
3. edit the Tomcat configuration file to turn on SSL.

Creating the Self-Signed Certificate

The Java Developer's Kit includes a utility to create certificates. Go to a command line and type the following:

keytool -genkey -alias tomcat -keyalg RSA

This command tells Java to generate a key. Actually, it does two things:

1. it creates a new key; and
2. if necessary, it creates a collection of keys (called a "key store") to put the key in.

There are some prompts that look like this:
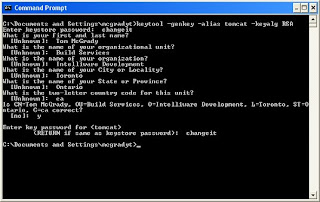


Notice that there are two prompts for the password. That's because there's one password for the keystore, and one password for the actual key.
Moving the Keystore

One of the things that the tool isn't very good about is telling you where it created that keystore. By default, the keygen tool puts information in the "Documents and Settings" directory for your userid. In the example, above, we'd find that they keystore has been created as a file called:

C:\Documents and Settings\mcgradyt\.keystore

That location isn't very helpful. Try copying it to the conf directory of your JBoss installation. For example:

C:\Program Files\jboss-4.0.3\server\default\conf

When I do this, I usually change the name to "chap8.keystore" because that's the default name used in the next step.
Update the Configuration File

First up, you should probably shut down the JBoss server as you do this step.

In the JBoss directory, there should be a file called server.xml:

C:\Program Files\jboss-4.0.3\server\default\deploy\jbossweb-tomcat55.sar\server.xml

This file includes information about what web features to turn on when the server starts up. Inside this file, there should be a part that looks like this:


Make the following changes:

1. Uncomment the block
2. Change the port to 443
3. Change the keystore password to the password used, above ("changeit")

The end result should look something like this:


maxThreads="100" strategy="ms" maxHttpHeaderSize="8192"
emptySessionPath="true"
scheme="https" secure="true" clientAuth="false"
keystoreFile="${jboss.server.home.dir}/conf/chap8.keystore"
keystorePass="changeit" sslProtocol = "TLS" />


Now start up the server, and if all went according to plan, SSL should now be enabled.
Installing an SSL Certificate

We purchased an SSL Certificate from Verisign. The company offers excellent documentations and instructions on how to install the certificate on their website. Once you purcahse the certificate Verisign we email the you the certificate only after you go through the process of getting all the information they require to verify the web server and wesite.

Below I included a screenshot of the installation process. It is a simply as using one of the java apache tools to install the certificate in the keystore file.


Configuring sslext plugin for Struts framework

The SSL Extension to Struts (SSLEXT) is an open-source plug-in for Struts. This software was created and is maintained by Steve Ditlinger (and others). It is hosted at SourceForge, http://sslext.sourceforge.net. It is the recommended approach for integrating Struts with SSL processing. Its features include:

* The ability to declaratively specify in the Struts configuration file whether or not an action mapping should be secure. This feature allows your application to switch protocols between actions and JSP pages.
* Extensions of the Struts JSP tags that can generate URLs that use the https protocol.

SSLEXT consists of a plug-in class for initialization, a custom extension to the Struts RequestProcessor, and a custom extension of the Struts ActionMapping. In addition, custom JSP tags, which extend the Struts tags, are provided for protocol-specific URL generation. SSLEXT also includes an additional JSP tag that lets you specify whether an entire JSP page is secure. SSLEXT depends on the Java Secure Socket Extension (JSSE), which is included with JDK 1.4 and later. Finally, you need to enable SSL for your application server. For Tomcat, this can be found in the Tomcat SSL How-To documentation.

SSLEXT works by intercepting the request in its SecureRequestProcessor. If the request is directed toward an action that is marked as secure, the SecureRequestProcessor generates a redirect. The redirect changes the protocol to https and the port to a secure port (e.g., 443 or 8443). This sounds simple enough; however, a request in a Struts application usually contains request attributes. These attributes are lost on a redirect. SSLEXT solves this problem by temporarily storing the request attributes in the session.

SSLEXT does not include a lot of documentation but it comes with a sample application that demonstrates its use and features. To try SSLEXT, you can modify Mini HR to use it by changing the login behavior so that the LoginAction occurs over HTTPS. Once logged in, the protocol should be switched back to HTTP. Take the following steps to set up SSLEXT for the Mini HR application:

1. Copy the sslext.jar file into the MiniHR19\WEB-INF\lib folder.
2. Copy the sslext.tld file into the MiniHR19\WEB-INF\tlds folder.
3. Add a taglib declaration in the web.xml for the sslext tag library as follows:


/WEB-INF/tlds/sslext.tld
/WEB-INF/tlds/sslext.tld location>


Now, make the following changes to the struts-config.xml file:

1. Add the type attribute to the action-mappings element to specify the custom secure action mapping class as follows:


2. Add the controllerelement configured to use the SecureRequestProcessor. If you are already using a custom request processor, change it to extend the SecureRequestProcessor.

processorClass="org.apache.struts.action.
SecureRequestProcessor"/>
3. Add the plug-indeclaration to load the SSLEXT code:

className="org.apache.struts.action.SecurePlugIn">


4. Set the secureproperty to true for the login action mapping by adding the following element


5. Finally, you need to configure the index.jsppage to always run on http, not https. Otherwise, after you log in, the protocol will remain on https. Add the following taglib directive and custom tag to the index.jsp page (after the existing taglib directives):

<%@ taglib uri="/WEB-INF/tlds/sslext.tld" prefix="sslext"%>


This tag is only needed for those JSP pages that are not accessed through your actions.

Now all you need to do is rebuild and redeploy the application. When you click the login link, the protocol will switch to https and the port will switch to 8443. After you log in, you should be redirected back to the index.jsp page and the protocol and port should switch back to http and 8080.You should experiment with using the tag to create links to secure actions. You will find that using SSLEXT is much easier than using the user-data-constraint subelement of the web.xml file. It gives you fine-grained control where you need it through the tags. At the same time, it leverages the struts-config.xml file to enable simple declarative configuration for secure request processing.